Nest.js, TypeScript 프로젝트 mindo - 3 Hot( Auth )
Entities 정의를 끝냈으니 맨 처음 작업은
Auth 의 sign-up, sign-in 을 구현해 보도록 하겠다.
시작에 앞서 openAPI swagger 를 사용하기 위해 다음 명령어를 실행 하였다.
windo@DESKTOP-6SMB85M MINGW64 ~/nestjs-mindo (main)
$ npm i --save @nestjs/swagger

added 3 packages, and audited 752 packages in 7s

114 packages are looking for funding
  run `npm fund` for details

37 moderate severity vulnerabilities

To address issues that do not require attention, run:
  npm audit fix

To address all issues (including breaking changes), run:
  npm audit fix --force

Run `npm audit` for details.
import { NestFactory } from '@nestjs/core';
import { AppModule } from './app.module';

async function bootstrap() {
  const app = await NestFactory.create(AppModule);
  await app.listen(3000);
}
bootstrap();
그리고 위 main.ts 파일에서
아래와 같이 swagger를 활용할 수 있도록 작성해 주었다.
공식 문서 OpenAPI (Swagger) | NestJS - A progressive Node.js framework
import { NestFactory } from '@nestjs/core';
import { AppModule } from './app.module';
import { DocumentBuilder, SwaggerModule } from '@nestjs/swagger';

async function bootstrap() {
  const app = await NestFactory.create(AppModule);

  const config = new DocumentBuilder()
    .setTitle('mindo example')
    .setDescription('The mindo API description')
    .setVersion('1.0')
    // .addTag('cats')
    .build();
  const document = SwaggerModule.createDocument(app, config);
  SwaggerModule.setup('api', app, document);

  await app.listen(3000);
}
bootstrap();
그리고 위 swagger API 를 내가 원하는 환경변수에 저장된 service Port 번호로 지정하기 위해 아래와 같이
코드를 작성해 주었다.
import { NestFactory } from '@nestjs/core';
import { AppModule } from './app.module';
import { DocumentBuilder, SwaggerModule } from '@nestjs/swagger';
import { ConfigService } from '@nestjs/config';

async function bootstrap() {
  const app = await NestFactory.create(AppModule);

  const configService = app.get(ConfigService);
  const port = configService.get('SERVER_PORT');

  const config = new DocumentBuilder()
    .setTitle('mindo example')
    .setDescription('The mindo API description')
    .setVersion('1.0')
    // .addTag('cats')
    .build();
  const document = SwaggerModule.createDocument(app, config);
  SwaggerModule.setup('api', app, document);

  await app.listen(port);
}
bootstrap();
위 코드는 데코레이터 module 옵션에 configModule 이 imports 되어있는 class AppModule 안에서
ConfigSevice 를 가져와 cofigService 로 환경변수를 사용할 수 있게 하였다.
그리하여 그 환경변수를 port 로 선언하였다.
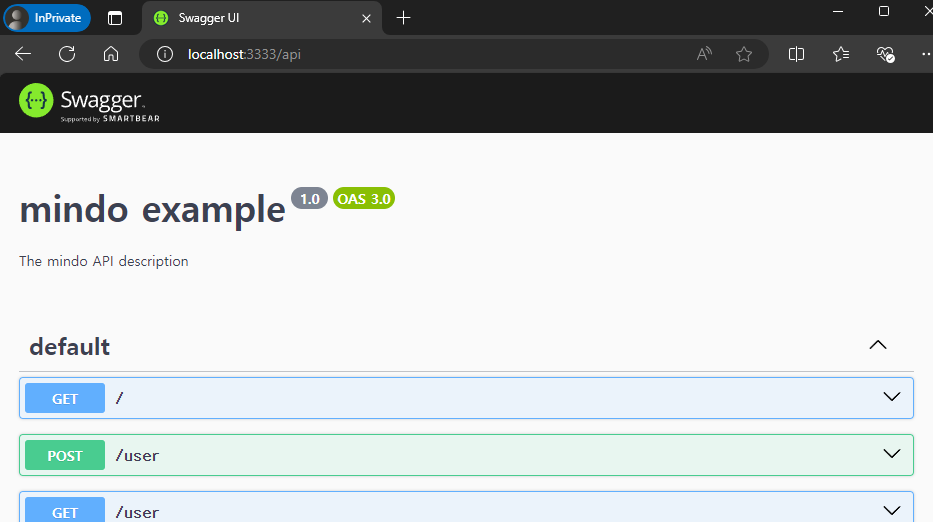
npm run start:dev 명령어를 통해 서버를 실행시키고 아래와 같이 swagger openAPI 가 잘 생성되었는지 확인하였다.
이제 회원가입을 위한 sign-up.dto 를 작성해 보도록 하겠다.
일단 기본적으로 회원가입에서 입력과 검증 받을 것을 아래와 같이 작성해 보았다.
import { PickType } from '@nestjs/swagger';
import { User } from 'src/user/entities/user.entity';

export class SignUpDto extends PickType(User, [
  'email',
  'password',
  'nickname',
]) {
  passwordConfirm: string;
}
여기서 PickType 은 @nestjs/mapped-types 가 아닌 @nestjs/swagger 를 활용할 것이다.
그리고 유효성 검사를 위해 아래와 같이 패키지를 설치해준다.
windo@DESKTOP-6SMB85M MINGW64 ~/nestjs-mindo (main)
$ npm i class-validator class-transformer

added 5 packages, and audited 757 packages in 3s

114 packages are looking for funding
  run `npm fund` for details

37 moderate severity vulnerabilities

To address issues that do not require attention, run:
  npm audit fix

To address all issues (including breaking changes), run:
  npm audit fix --force

Run `npm audit` for details.
1. class-validator
DTO 클래스에 유효성 검사 데코레이터를 사용할 수 있게 해준다.
예를 들어, @IsString(), @IsInt(), @IsNotEmpty() 등의 데코레이터를 사용하여 입력된 데이터의 타입과 필수 여부를 검증할 수 있다.
2. class-transformer
요청에서 받은 데이터를 DTO 클래스의 인스턴스로 자동으로 변환해준다.
plainToInstance()와 같은 함수를 사용하여 객체 변환을 수행한다.
email, password, nickname 같은 경우 User 엔티티에서 정의된것을 간단하게 가져오기 위해 picktype 을 사용하였고,
그것을 유효성검사를 해야하니 Entity에서 class-validator 데코레이터를 사용하였다.
import {
  Column,
  CreateDateColumn,
  Entity,
  OneToMany,
  PrimaryGeneratedColumn,
  UpdateDateColumn,
} from 'typeorm';
import { UserRole } from '../roles/user-role';
import { Book } from 'src/book/entities/book.entity';
import { getPoints } from '../points/points';
import {
  IsEmail,
  IsNotEmpty,
  IsString,
  IsStrongPassword,
} from 'class-validator';

@Entity({
  name: 'users',
})
export class User {
  @PrimaryGeneratedColumn({ unsigned: true })
  id: number;

  @IsNotEmpty({ message: '이메일을 입력해 주세요.' })
  @IsEmail({}, { message: '이메일 형식에 맞지 않습니다.' })
  @Column({ unique: true })
  email: string;

  @IsNotEmpty({ message: '비밀번호를 입력해 주세요.' })
  @IsStrongPassword(
    {},
    {
      message:
        '비밀번호는 영문 알파벳 대,소문자, 숫자, 특수문자(!@#$%^&*)를 포함해서 8자리 이상으로 입력해야 합니다.',
    },
  )
  @Column()
  password: string;

  @IsNotEmpty({ message: '닉네임을 입력해 주세요.' })
  @IsString()
  @Column()
  nickname: string;

  @Column({ unsigned: true, default: getPoints.DEFAULT.POINTS })
  points: number;

  @Column({ type: 'enum', enum: UserRole, default: UserRole.Customer })
  role: UserRole;

  @CreateDateColumn()
  createdAt: Date;

  @UpdateDateColumn()
  updatedAt: Date;

  @OneToMany((type) => Book, (book) => book.user)
  books: Book[];
}
이메일과 패스워드는 유효성검증 형식이 있기 때문에 따로 @IsString을 작성할 필요는 없었다.
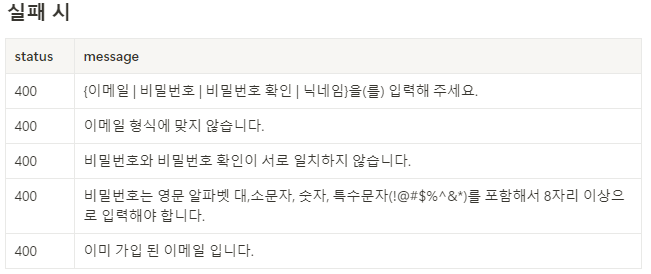
API 명세서를 참고하여 message 를 작성 해 주었고
IsEmail, IsStrongPassword 파라미터 인자값 형식은 다른 데코레이터와 다르게 {},{ 옵션(message) }를 입력한 이유는
아래와 같다.


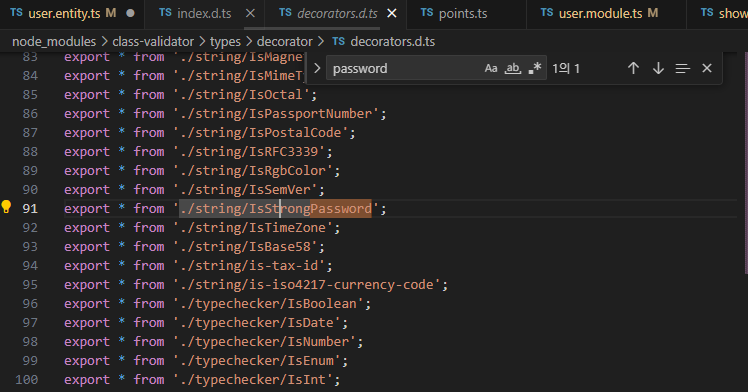
만약 class-validator 유효성검증 데코레이터 이름이 기억이 안날시 아래와 같이 찾아보면서 하였다.
이렇게 User 클래스 Entity 에서 유효성검증을 작성완료 하였고
다시 dto로 와서 작성을 마저 해보도록 하겠다.
import { PickType } from '@nestjs/swagger';
import { IsNotEmpty, IsStrongPassword } from 'class-validator';
import { User } from 'src/user/entities/user.entity';

export class SignUpDto extends PickType(User, [
  'email',
  'password',
  'nickname',
]) {
  @IsNotEmpty({ message: '비밀번호 확인을 입력해 주세요.' })
  @IsStrongPassword(
    {},
    {
      message:
        '비밀번호는 영문 알파벳 대,소문자, 숫자, 특수문자(!@#$%^&*)를 포함해서 8자리 이상으로 입력해야 합니다.',
    },
  )
  passwordConfirm: string;
}
DB에 저장할 필요없어 Entity에 정의되지 않은 passwordConfirm 은 dto 에서 유효성 검증을 데코레이터로 위와같이
작성해 주었다.
이제 위 dto를 활용하여 회원가입 로직을 작성해 보도록 하겠다.
import {
  Controller,
  Get,
  Post,
  Body,
  Patch,
  Param,
  Delete,
  HttpStatus,
} from '@nestjs/common';
import { AuthService } from './auth.service';
import { SignInDto } from './dtos/sign-in.dto';

@Controller('auth')
export class AuthController {
  constructor(private readonly authService: AuthService) {}

  @Post()
  create(@Body() signInDto: SignInDto) {
    const data = this.authService.create(signInDto);
    return {
      statusCode: HttpStatus.CREATED,
      message: '회원가입에 성공했습니다.',
      data,
    };
  }
}
위와같이 일단 기본적인 컨트롤러를 작성해 주고
아래와같이 auth.s